Did you know that page speed is part of SEO? It’s true! If your site takes longer than six seconds to load, chances are, someone is going to hit the back button and cause a high bounce rate on your site. You can check your bounce rate by installing Google Analytics. This is no good. Another thing to realize, more and more people are accessing your web site with mobile phones and other mobile devices. Those devices often have slow Internet connections, so speeding up your site will also improve your site experience for those users too! There are two ways to speed up your site for mobile users, but we’re only going to talk about one of them. The one we are not going to talk about is basically installing a mobile theme such as WP-Touch.
Use W3 Total Cache to Speed Up Your WordPress Site or Blog
Our website uses the plugin W3 Total cache. It has sped up our site from loading in 6-8 seconds down to only about 2 seconds on the home page. This is a pretty remarkable feat just by installing and configuring one plugin. The W3 Total Cache plugin works in a number of different ways and has many features. Some of those features are:
[custom_list style=”list-7″]
- Compatible with shared hosting, virtual private / dedicated servers and dedicated servers / clusters
- Transparent content delivery network (CDN) integration with Media Library, theme files and WordPress itself
- Mobile support: respective caching of pages by referrer or groups of user agents including theme switching for groups of referrers or user agents
- Caching of (minified and compressed) pages and posts in memory or on disk or on CDN (mirror only)
- Caching of (minified and compressed) CSS and JavaScript in memory, on disk or on CDN
- Caching of feeds (site, categories, tags, comments, search results) in memory or on disk or on CDN (mirror only)
- Caching of search results pages (i.e. URIs with query string variables) in memory or on disk
- Caching of database objects in memory or on disk
- Caching of objects in memory or on disk
- Minification of posts and pages and feeds
- Minification of inline, embedded or 3rd party JavaScript (with automated updates)
- Minification of inline, embedded or 3rd party CSS (with automated updates)
- Browser caching using cache-control, future expire headers and entity tags (ETag) with “cache-busting”
- JavaScript grouping by template (home page, post page etc) with embed location control
[/custom_list]
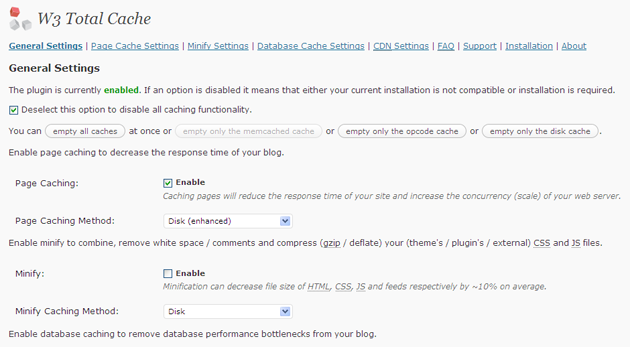
The first step to speeding up your website with W3 Total Cache is to install it first. The easiest way to install a WordPress plugin is to login to the dashboard, click on plugins and then click, “Add New” under the plugins menu. You can then do a search for, “W3 Total Cache” and install the plugin that way. Once installed you will want to head over to the main configuration page.

You will then be presented with a number options. Here is a quick rundown:
- Deactivate and delete any other caching plugin you may be using. Make sure wp-content/ and wp-content/uploads/ (temporarily) has 777 permissions before proceeding, e.g.:
# chmod 777 /var/www/vhosts/domain.com/httpdocs/wp-content/using your web hosting control panel or your SSH account. - Login as an administrator to your WordPress Admin account. Using the “Add New” menu option under the “Plugins” section of the navigation, you can either search for: w3 total cache or if you’ve downloaded the plugin already, click the “Upload” link, find the .zip file you download and then click “Install Now”. Or you can unzip and FTP upload the plugin to your plugins directory (wp-content/plugins/). In either case, when done wp-content/plugins/w3-total-cache/ should exist.
- Locate and activate the plugin on the “Plugins” page. Page caching will automatically be running in basic mode. Set the permissions of wp-content and wp-content/uploads back to 755, e.g.:
# chmod 755 /var/www/vhosts/domain.com/httpdocs/wp-content/. - Now click the “Settings” link to proceed to the “General” tab and select your caching methods for page, database and minify. In most cases, “disk enhanced” mode for page cache, “disk” mode for minify and “disk” mode for database caching are “good” settings.
- Recommended: On the “Minify Settings” tab, all of the recommended settings are preset. Use the help button to simplify discovery of your CSS and JS files and groups. Pay close attention to the method and location of your JS group embeddings. See the plugin’s FAQ for more information on usage.
- Recommended: On the “Browser Cache” tab, HTTP compression is enabled by default. Make sure to enable other options to suit your goals.
- Recommended: If you already have a content delivery network (CDN) provider, proceed to the “Content Delivery Network” tab and populate the fields and set your preferences. If you do not use the Media Library, you will need to import your images etc into the default locations. Use the Media Library Import Tool on the “Content Delivery Network” tab to perform this task. If you do not have a CDN provider, you can still improve your site’s performance using the “Self-hosted” method. On your own server, create a subdomain and matching DNS Zone record; e.g. static.domain.com and configure FTP options on the “Content Delivery Network” tab accordingly. Be sure to FTP upload the appropriate files, using the available upload buttons.
- Recommended: On the “Browser Cache” tab, HTTP compression is enabled by default. Make sure to enable other options to suit your goals.
- Optional: On the “Database Cache” tab, the recommended settings are preset. If using a shared hosting account use the “disk” method with caution, the response time of the disk may not be fast enough, so this option is disabled by default. Try object caching instead for shared hosting.
- Optional: On the “Object Cache” tab, all of the recommended settings are preset. If using a shared hosting account use the “disk” method with caution, the response time of the disk may not be fast enough, so this option is disabled by default. Test this option with and without database cache to ensure that it provides a performance increase.
- Optional: On the “User Agent Groups” tab, specify any user agents, like mobile phones if a mobile theme is used.

